The best walk-in pantry design makes food, small appliances, serving pieces, and household supplies easy to see and reach without turning the room into an overcrowded storage closet. A successful pantry needs more than rows of shelves. Its layout, shelf depths, lighting, ventilation, electrical planning, and organization should all reflect how the household shops, cooks, and uses the kitchen.
A large pantry can still be frustrating when shelves are too deep, corners are difficult to reach, or frequently used items are stored far from the entrance. A smaller pantry may work extremely well when it has properly sized shelves, clear walking space, and storage zones based on everyday routines.
Before choosing cabinets or containers, identify exactly what the pantry needs to store. Designing around real household needs will produce a more functional result than copying a pantry created for someone else.
What Is a Walk-In Pantry?
A walk-in pantry is a separate storage space that is large enough for a person to enter. It is usually located next to or near the kitchen and may include open shelving, cabinets, drawers, countertops, electrical outlets, or space for small appliances.
Unlike a reach-in pantry, which is accessed from outside through a door, a walk-in pantry has an interior aisle or standing area. This can provide more total storage, but it also uses floor space for circulation.
A walk-in pantry may be used for:
- Shelf-stable food
- Canned goods
- Baking ingredients
- Snacks
- Beverages
- Small appliances
- Cookware
- Serving pieces
- Bulk purchases
- Paper products
- Cleaning supplies
- Recycling or waste sorting
Not every pantry should store every category. Food, appliances, and household products should be arranged carefully so that the room remains sanitary, safe, and easy to maintain.
Walk-In Pantry Design Ideas at a Glance
The following table summarizes the most important planning decisions.
| Design area | Practical approach | Common mistake |
|---|---|---|
| Layout | Match the shelving arrangement to the room’s width and shape | Installing shelves on every wall without preserving an aisle |
| Shelf depth | Use different depths for different products | Making every shelf so deep that items disappear |
| Shelf spacing | Use adjustable shelves where possible | Leaving excessive vertical space between short products |
| Corners | Use continuous shelves, curved corners, or accessible storage | Creating deep blind corners |
| Lighting | Combine ceiling lighting with shelf or counter lighting | Relying on one fixture that leaves dark shelves |
| Storage zones | Group products according to how they are used | Organizing only by package size or appearance |
| Countertops | Reserve workspace for appliances, unpacking, or food preparation | Adding a counter that reduces essential shelving |
| Electrical planning | Plan outlets for approved appliance use before construction | Running extension cords into the pantry |
| Ventilation | Keep the room reasonably dry and comfortable | Trapping heat around appliances |
| Flooring | Choose a durable, easy-to-clean surface | Selecting a material that is easily damaged by spills |
| Accessibility | Keep everyday items within comfortable reach | Placing frequently used products on high shelves |
| Containers | Use them selectively and label transferred food | Decanting everything without recording dates or instructions |
Start With an Inventory
Before designing the room, examine what is currently stored in the kitchen, cabinets, closets, garage, or basement. A pantry designed without an inventory may provide abundant space for the wrong items.
Create groups such as:
- Everyday dry food
- Breakfast items
- Snacks
- Baking supplies
- Canned and jarred food
- Pasta, rice, and grains
- Beverages
- Bulk purchases
- Small appliances
- Cookware and bakeware
- Serving pieces
- Paper products
- Pet supplies
- Cleaning supplies
Measure large or unusual items. A countertop appliance, bulk package, beverage container, or tall cereal box may not fit standard shelf spacing.
Also consider shopping habits. A household that buys groceries weekly needs a different pantry from one that purchases large quantities less frequently. Storage should support the household’s normal routine rather than encouraging unnecessary accumulation.
Choose the Right Pantry Layout
The room’s dimensions determine which shelving layouts are practical. The objective is to maximize accessible storage while preserving comfortable movement.
Single-Wall Pantry
A single-wall layout places shelves, cabinets, or counters along one side of the pantry. It works well in narrow spaces where shelving on both sides would make the aisle uncomfortable.
This layout can provide:
- A clear walking path
- Easy visibility
- Space for deeper lower storage
- Room for hooks or shallow storage on the opposite wall
- Straightforward lighting
The open wall should not automatically be filled with additional storage. A clear wall may make the pantry easier to enter, use, and clean.
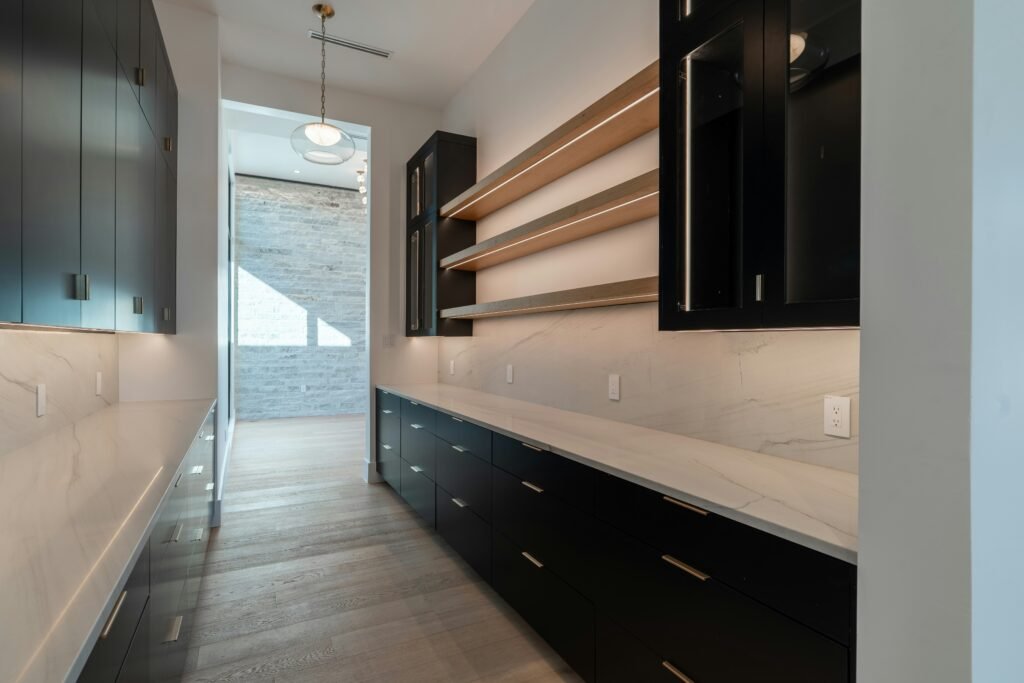
Galley Pantry
A galley layout places storage on two opposing walls. It can offer substantial capacity in a long, narrow room.
To keep a galley pantry functional:
- Use shallower storage where the room is narrow.
- Keep shelves from projecting into the entrance.
- Avoid placing cabinet handles where they narrow the aisle.
- Provide enough space to bend, turn, and carry items.
- Make sure drawers and cabinet doors can open without blocking access.
A galley pantry is most effective when its aisle remains comfortable after shelves, countertop edges, handles, and trim are installed.
L-Shaped Pantry
An L-shaped layout places storage on two connecting walls. It can balance capacity with open floor space and may be suitable for a square or moderately sized pantry.
One wall can hold food while the second accommodates appliances, serving pieces, or deeper storage. The open walls may improve visibility and reduce the risk of overcrowding the room.
U-Shaped Pantry
A U-shaped pantry uses three walls for storage. It can provide excellent capacity, but it requires enough interior width to prevent the center aisle from feeling confined.
The corners require careful planning. Deep shelves meeting at a right angle can create inaccessible areas where products are forgotten.
Possible corner solutions include:
- Continuous wraparound shelves
- Curved corner shelves
- Angled shelves
- Shallower shelves near the corner
- Storage for lightweight, infrequently used items
- Corner cabinets designed for easy access
Do not choose a U-shaped arrangement merely because it offers the most linear shelving. Accessible storage is more valuable than a greater quantity of hard-to-reach shelves.
Determine a Comfortable Aisle Width
The pantry aisle should allow a person to enter, turn, reach shelves, carry groceries, and open any drawers or cabinet doors.
Approximately 36 inches of clear aisle space may serve as a practical starting point for a pantry used by one person, while additional width can make it easier for two people to use the room or for someone to turn with bags and containers. The appropriate dimension depends on the room, shelving depth, door swing, household needs, and accessibility goals.
Measure clear space from the finished edge of the shelves, countertops, cabinets, or hardware—not merely from wall to wall.
Use painter’s tape or cardboard to mark the proposed shelves on the floor. Test the layout while carrying a grocery bag, bending toward lower shelves, and opening simulated drawers or doors.
These dimensions are planning considerations rather than universal code requirements. Accessibility standards, residential codes, and local requirements may establish different clearances for particular projects.
Use Different Shelf Depths
One of the most common walk-in pantry design mistakes is making every shelf equally deep.
Deep shelves hold more in theory, but small products can disappear behind one another. Shallow shelves improve visibility and reduce the need to move several items to reach something at the back.
The following ranges can provide a useful planning reference:
| Stored item | Possible shelf depth |
|---|---|
| Spices, cans, jars, and small containers | 6–10 inches |
| Everyday dry food and boxed products | 10–14 inches |
| Mixing bowls and medium appliances | 14–18 inches |
| Large appliances, bulk packages, and deep bins | 18–24 inches |
These are broad planning ranges, not fixed rules. Measure the products that will actually be stored before finalizing the shelves.
A useful strategy is to place shallower shelves near eye level and deeper shelves lower down. Large bins or appliances can occupy the deeper storage, while everyday food remains visible above.
Make the Shelves Adjustable
Adjustable shelving allows the pantry to change as products, appliances, and household needs change.
Fixed shelves may waste vertical space when short cans sit beneath a large gap. They can also prevent tall bottles or appliances from fitting in the future.
Adjustable shelves can be useful for:
- Canned goods
- Cereal boxes
- Baking ingredients
- Beverage storage
- Small appliances
- Serving pieces
- Changing household needs
Consider including a combination of fixed and adjustable shelves. Fixed shelves can strengthen long runs or support built-in cabinetry, while adjustable sections provide flexibility.
Make sure shelf supports are appropriate for the expected weight. Canned goods, glass jars, appliances, and bulk food can place substantial loads on shelving. Shelf span, thickness, material, fastening, and wall structure all affect capacity.
Plan Shelf Heights Around Real Products
Shelf spacing should correspond with the items stored in each zone.
Frequently used products should generally be located between approximately waist and eye level. Heavy items are usually safer on lower shelves, while lightweight and infrequently used products can occupy higher areas.
Consider arranging shelves for:
- Short cans and jars
- Standard food boxes
- Tall bottles
- Bulk containers
- Baskets
- Countertop appliances
- Serving platters
- Paper products
Avoid placing every shelf at equal intervals simply for visual symmetry. A pantry is more useful when shelf spacing reflects its contents.
If the pantry will serve people of different heights or abilities, create accessible zones for each user. The U.S. Access Board’s guidance on accessible reach ranges illustrates why shelf height and reach depth affect usability. Although residential requirements vary, these principles can help homeowners think more carefully about long-term accessibility.
Prevent Items From Disappearing on Deep Shelves
If existing shelves are deeper than the products being stored, use organization methods that bring items forward.
Options include:
- Pullout trays
- Drawers
- Sliding baskets
- Tiered shelf inserts
- Turntables
- Labeled bins
- Shelf risers
- Dividers
- Shallow containers arranged front to back
Avoid placing several unrelated rows of small items on one deep shelf. The products at the back are likely to be forgotten.
Pullouts and drawers should open without blocking the pantry entrance or striking storage on the opposite wall.
Create Storage Zones
Organizing a pantry by activity can make it easier to use than arranging products only by size or appearance.
Possible zones include:
Everyday Cooking Zone
Keep oils, grains, pasta, sauces, and frequently used ingredients close to the entrance or at a comfortable height.
Baking Zone
Store flour, sugar, baking powder, extracts, decorating supplies, pans, and mixing equipment together.
Breakfast Zone
Group cereal, oatmeal, spreads, coffee, tea, and other morning items in one area.
Snack Zone
Place household snacks together. If children need independent access, use a shelf or drawer at an appropriate height and keep unsuitable products elsewhere.
Beverage Zone
Use stronger lower shelving for bottled drinks and other heavy beverages. Avoid placing heavy cases on high shelves.
Appliance Zone
Store mixers, slow cookers, blenders, and other equipment on deeper shelves or in cabinets designed for their dimensions and weight.
Backstock Zone
Reserve a defined area for duplicate and bulk products. Keeping backstock separate prevents opened and unopened packages from becoming mixed.
Nonfood Zone
If paper products or cleaning supplies must share the pantry, keep them in a clearly separated location. Follow product labels and avoid storing chemicals where they could leak onto food.
Use Drawers for Small or Loose Items
Open shelves are useful for visibility, but drawers can control smaller products that tend to spread across a shelf.
Drawers may work well for:
- Packets
- Reusable bags
- Foil and wraps
- Towels
- Small baking tools
- Lunch supplies
- Pet accessories
- Appliance attachments
Full-extension drawers make the contents easier to see. Deep drawers can accommodate heavier food or cookware, but they require strong slides and suitable construction.
Avoid installing more drawers than necessary. A pantry filled entirely with closed storage may force users to open several drawers before finding an item.
Decide Whether You Need a Countertop
A countertop can make a walk-in pantry more versatile, but it also occupies wall space that could otherwise hold shelving.
A pantry counter may be useful for:
- Unpacking groceries
- Preparing coffee
- Using approved small appliances
- Filling storage containers
- Organizing serving pieces
- Folding reusable bags
- Staging items before cooking
Before adding one, decide what will happen there. A counter without a clear purpose can become a collection point for clutter.
The counter depth should reflect its intended use. A shallow surface may be sufficient for grocery staging, while appliances require enough depth, clearance, electrical planning, and ventilation.
Do not assume every appliance can be operated safely inside a pantry. Follow manufacturer instructions and applicable electrical, fire-safety, ventilation, and building requirements.
Plan Electrical Outlets Before Construction
If the pantry will contain a countertop or appliance station, plan electrical needs before walls and cabinets are completed.
Potential uses may include:
- Coffee equipment
- Microwave
- Toaster
- Mixer
- Charging station
- Beverage refrigerator
- Vacuum
- Pantry lighting
Electrical requirements depend on the appliance, circuit capacity, outlet location, countertop arrangement, moisture exposure, and local code.
Avoid using extension cords as a permanent solution. Ask a qualified electrician to determine whether dedicated circuits, special outlet protection, or other electrical work is required.
Appliances that generate heat need appropriate clearances and ventilation. Do not enclose them behind doors or beneath low shelving unless the manufacturer permits that installation.
Include Layered Lighting
A walk-in pantry needs enough light to read labels, inspect products, and clean shelves. A single ceiling fixture may leave shadows beneath deep shelving.
A practical lighting plan may combine:
- Ceiling lighting for general illumination
- LED strips beneath shelves
- Vertical lighting near tall shelving
- Countertop task lighting
- Motion or occupancy sensors
- Door-activated lighting
Place fixtures where shelves will not block them. Lighting installed in the center of the ceiling may still leave the fronts of tall shelves illuminated and the back areas dark.
Select fixtures and controls appropriate for the location. Plan wiring before drywall and built-ins are installed to avoid visible cords or unnecessary repairs later.
Motion sensors can be useful when someone enters while carrying groceries. Make sure the light remains on long enough to prevent it from switching off while a person is standing relatively still.
Consider Ventilation and Temperature
A pantry should remain reasonably dry and protected from excessive heat. Conditions inside the room can be affected by nearby appliances, exterior walls, plumbing, sunlight, and limited air circulation.
The U.S. Department of Agriculture explains that shelf-stable foods are products that can be safely stored at room temperature. However, storage instructions vary by product, and some foods must be refrigerated after opening. Its guide to shelf-stable food safety provides additional food-storage information.
To create better pantry conditions:
- Follow package storage instructions.
- Keep food away from direct sunlight.
- Avoid placing food beside heat-generating appliances.
- Address moisture or plumbing leaks promptly.
- Do not block required vents.
- Avoid trapping appliance heat inside closed cabinetry.
- Maintain enough airflow to discourage stale odors and moisture buildup.
A walk-in pantry is not automatically suitable for storing every type of food. Products requiring refrigeration or controlled conditions should be stored accordingly.
Choose Durable Shelving Materials
Pantry shelves must support their contents without sagging and should be easy to clean.
Possible materials include:
Painted Wood or Plywood
Wood-based shelving can be customized, painted, and integrated with cabinetry. The material, thickness, edge treatment, support spacing, and finish affect durability.
Melamine or Laminated Panels
These surfaces are generally smooth and easy to wipe. Exposed edges should be properly finished, and spans should be supported to prevent sagging.
Wire Shelving
Wire shelves allow airflow and are often adjustable. However, narrow packages may tip, and small spills can fall onto lower shelves. Shelf liners may help but can reduce ventilation.
Metal Shelving
Metal can provide strength and an industrial appearance. Confirm that the finish is appropriate for interior use and that edges and connections are safe.
Solid-Surface Shelves
Stone or manufactured surfaces may be used for counters or selected shelves, but their weight, support requirements, cost, and installation should be evaluated.
Whichever material is chosen, confirm that the shelf construction can support heavy cans, glass containers, and appliances.
Select Easy-to-Clean Flooring
Pantry flooring should tolerate crumbs, spills, grocery traffic, and the movement of bins or small carts.
Suitable flooring depends on the surrounding kitchen and the home’s construction. Priorities may include:
- Durability
- Easy cleaning
- Resistance to ordinary spills
- Comfortable transitions
- Slip resistance
- Compatibility with the subfloor
- Visual continuity with the kitchen
Continuing the kitchen flooring into the pantry can make the areas feel connected and eliminate an unnecessary threshold. However, the material and installation should still be suitable for the pantry’s use.
Avoid creating a raised transition that becomes a tripping hazard or makes it difficult to roll a cart.
Choose the Door Carefully
The pantry door affects both interior storage and kitchen circulation.
Common options include:
Swinging Door
A hinged door can provide privacy and control visual clutter. Confirm that its swing does not block a kitchen walkway, collide with cabinetry, or make the pantry difficult to enter.
Pocket Door
A pocket door can save floor space because it slides into the wall. However, the wall must be suitable for the door system and may not be able to contain plumbing, wiring, or certain structural components in the same area.
Sliding Barn-Style Door
A surface-mounted sliding door can create a wide opening without an interior swing. It requires clear wall space beside the opening and may not seal as completely as a hinged door.
Double Doors
Double doors may improve access to a wide pantry, but they require suitable wall and circulation space.
Doorless Opening
An open pantry provides immediate access but leaves the contents visible from the kitchen and may allow more light, heat, and cooking residue to enter.
Avoid selecting a door based only on appearance. Test how it will operate when someone is carrying groceries or when another person is working in the kitchen.
Use the Back of the Door Carefully
The interior side of a hinged pantry door may provide useful shallow storage.
It can hold:
- Lightweight packets
- Wraps and bags
- Small cleaning tools
- Aprons
- Reusable shopping bags
- Lightweight baskets
Do not overload the door with heavy cans, bottles, or appliances. Excessive weight can affect hinges and door alignment.
Make sure door-mounted storage does not strike shelves, block the handle, or prevent the door from closing.
Add a Small-Appliance Zone
Small appliances often occupy valuable kitchen countertops because they are inconvenient to retrieve from deep cabinets.
A dedicated appliance zone can keep them accessible while reducing kitchen clutter.
Measure each appliance, including handles, lids, cords, and any space required to operate it. Consider:
- Appliance weight
- Shelf height
- Shelf depth
- Electrical requirements
- Ventilation
- Required clearances
- Frequency of use
- Safe lifting height
- Cord storage
Heavy appliances should not be stored where they must be lifted overhead. Frequently used equipment should be easy to retrieve without moving several other items.
If appliances will be operated in the pantry, obtain appropriate electrical and design guidance rather than assuming storage shelves can function as an appliance workstation.
Incorporate Accessible Storage
A pantry can be designed to remain useful as household needs change.
Accessibility-minded features may include:
- A wider, unobstructed entrance
- A comfortable turning or standing area
- Frequently used items within easy reach
- Pullout shelves and drawers
- Easy-to-grip handles
- Good lighting
- Limited high storage
- Heavy products on lower shelves
- Labels with clear text
- Controls that are easy to operate
Avoid placing all essential products above shoulder height or near the floor. A mix of shelf levels allows users to store different objects safely.
Our guide to aging-in-place remodeling ideas provides additional ways to make storage and living spaces safer and easier to use over time.
Use Containers Selectively
Matching containers can create a tidy appearance, but transferring every product is not always the most practical approach.
Containers are useful when they:
- Protect products after opening
- Keep small packages together
- Make bulk ingredients easier to use
- Fit shelves more efficiently
- Allow contents to be seen
- Prevent lightweight packages from tipping
When transferring food, preserve important information such as:
- Product name
- Allergen information
- Preparation instructions
- Expiration or quality dates
- Lot or recall information
Do not combine a new product with an older one without first emptying and cleaning the container. Place older food where it will be used first.
Bins should not be so large that they become heavy or conceal forgotten products.
Label for Function, Not Just Appearance
Labels can help household members return products to the correct place. Broad categories are often more practical than highly specific labels.
Useful examples include:
- Breakfast
- Baking
- Snacks
- Pasta and grains
- Canned vegetables
- Beverages
- Backstock
- Pet supplies
- Paper products
Labels should be easy to update because household needs change. Removable or replaceable labels provide more flexibility than permanent markings.
Avoid creating so many categories that putting groceries away becomes unnecessarily complicated.
Plan for Grocery Unloading
The route from the home’s entrance to the pantry affects everyday convenience.
Consider:
- Which entrance is normally used after shopping
- Whether bags can be placed temporarily on a counter
- Whether the pantry door can remain open during unloading
- Whether the path crosses a busy cooking area
- How bulk or heavy products will be carried
- Whether recycling is nearby
A pantry located close to the kitchen is useful, but its entrance should not interfere with refrigerator doors, ovens, dishwashers, or major walkways.
Before changing the kitchen layout, read how to plan a home remodel to define the project scope, budget, and construction requirements.
Avoid Common Walk-In Pantry Design Mistakes
Several design choices can reduce the value of a walk-in pantry:
Making Every Shelf Too Deep
Deep shelves encourage products to be stored in several rows, making the items at the back difficult to see.
Ignoring the Clear Aisle
Shelves may fit on a drawing but leave too little space after countertops, trim, doors, and handles are installed.
Using Fixed Shelves Everywhere
Fixed spacing reduces flexibility and may waste vertical space.
Creating Blind Corners
Deep intersecting shelves can trap products in inaccessible areas.
Placing Heavy Items Too High
Beverages, appliances, and bulk packages are generally safer on strong lower shelves.
Forgetting Electrical Planning
Adding outlets after built-ins are installed can require cutting and repair.
Providing Inadequate Lighting
Dark shelves make labels difficult to read and allow forgotten products to accumulate.
Adding a Counter Without a Purpose
An unnecessary counter can reduce storage and become a cluttered surface.
Ignoring Ventilation
Heat from appliances or limited airflow can make the pantry uncomfortable and unsuitable for certain products.
Designing for Photographs Instead of Daily Use
A visually coordinated pantry may still be inconvenient if products are difficult to reach, containers are heavy, or the organization system requires constant maintenance.
Walk-In Pantry Versus Reach-In Pantry
A walk-in pantry is not automatically the better choice. The most efficient option depends on the available space and storage needs.
| Walk-in pantry | Reach-in pantry |
|---|---|
| Offers more total storage potential | Uses less floor space |
| Can contain appliances and counters | Keeps most products visible from outside |
| Requires an interior aisle | Does not sacrifice space to circulation |
| May allow multiple storage zones | Can be easier to organize |
| Can hide visual clutter | Usually holds fewer large items |
| Requires careful lighting | May receive more light from the kitchen |
A reach-in pantry with full-extension drawers or properly designed shallow shelves may be more efficient than a narrow walk-in pantry with inaccessible corners.
Before converting valuable kitchen space, compare how much accessible storage each option would actually provide.
How to Keep the Pantry Organized After Remodeling
A good walk-in pantry design should not require constant reorganization.
To keep it functional:
- Leave some open space for future purchases.
- Group duplicate products together.
- Place older food in front of newer food.
- Review expiration and quality dates regularly.
- Clean spills promptly.
- Avoid buying more than the available storage can hold.
- Return products to consistent zones.
- Adjust shelf heights when storage needs change.
- Remove appliances and supplies that are no longer used.
- Check for leaks, pests, or moisture.
Do not treat every empty shelf as space that must be filled. A modest amount of open capacity makes grocery unloading easier and prevents the pantry from becoming overcrowded.
Frequently Asked Questions
How deep should walk-in pantry shelves be?
Shelf depth should match the products being stored. Approximately 6 to 10 inches may work for spices, cans, and jars; 10 to 14 inches for many dry-food packages; and 14 to 24 inches for appliances, bins, or bulk products. These are planning ranges rather than universal requirements.
How wide should a walk-in pantry aisle be?
Approximately 36 inches of clear space may be a useful starting point for a pantry primarily used by one person. More space may be needed for two users, accessibility, turning, drawers, or cabinet doors. Measure from the finished storage surfaces and confirm applicable local requirements.
Are adjustable shelves better for a pantry?
Adjustable shelves provide flexibility for changing package sizes, appliances, and household needs. Some fixed shelving may still be needed for structural support or built-in cabinetry.
Should a walk-in pantry have a window?
A window can provide natural light, but direct sunlight may increase heat and expose food to light. A window can also reduce available shelving. Consider privacy, insulation, ventilation, storage needs, and the room’s exterior conditions.
Does a walk-in pantry need ventilation?
Ventilation needs depend on the room, climate, appliance use, and construction. The pantry should not trap excessive heat or moisture. Appliances must be installed and operated according to manufacturer instructions and applicable codes.
Can a microwave or coffee maker be used in a pantry?
Possibly, but safe use depends on electrical capacity, outlet placement, clearances, ventilation, counter design, and manufacturer requirements. Consult qualified professionals before designing an appliance station.
Should pantry shelves go all the way to the ceiling?
High shelves can store lightweight, infrequently used products, but they should not be the primary location for everyday or heavy items. Make sure upper storage can be accessed safely.
What is the best flooring for a walk-in pantry?
Choose durable, easy-to-clean flooring that works with the subfloor and surrounding kitchen. Continuing the kitchen floor into the pantry can create visual continuity and eliminate an unnecessary transition.
Is a walk-in pantry worth the space?
It can be valuable for households that need substantial food, appliance, or serving storage. However, it is worthwhile only when it provides more accessible storage than alternative cabinets or a reach-in pantry.
Design the Pantry Around Everyday Use
A successful walk-in pantry design begins with an inventory and a realistic understanding of how the household shops, cooks, and stores food. Proper shelf depths, adjustable spacing, clear walking room, useful lighting, and well-planned storage zones matter more than decorative containers or perfectly matching labels.
Prioritize visibility and access. Keep everyday products within comfortable reach, place heavy items lower, avoid unnecessarily deep shelves, and plan electrical or appliance features before construction begins.
When the pantry is designed around actual routines, it can reduce kitchen clutter, simplify grocery storage, and make everyday meal preparation more efficient.
Remodeling Note: This article provides general educational information about walk-in pantry design. Appropriate dimensions, electrical work, ventilation, materials, accessibility features, permits, and construction methods vary by home and location. Consult qualified local professionals and follow applicable codes, product instructions, and food-storage guidance before building or remodeling a pantry.