Once drywall is installed, much of a remodeling project’s structural, electrical, plumbing, mechanical, insulation, and air-sealing work disappears from view. Correcting a misplaced outlet or missing cabinet support is relatively straightforward while the wall framing remains exposed. Fixing the same problem afterward may require cutting, repairing, sanding, and repainting finished walls.
The period after rough work is completed but before drywall goes up is therefore one of the most valuable quality-control opportunities in a remodel. Homeowners should not attempt to approve technical work that requires professional expertise, but they can participate in a documented walkthrough, verify that the planned features are in the correct locations, and confirm that required inspections have been completed.
This is also the best time to photograph concealed pipes, wiring, ducts, blocking, framing, and other components that may need to be located in the future.
What Is a Pre-Drywall Walkthrough?
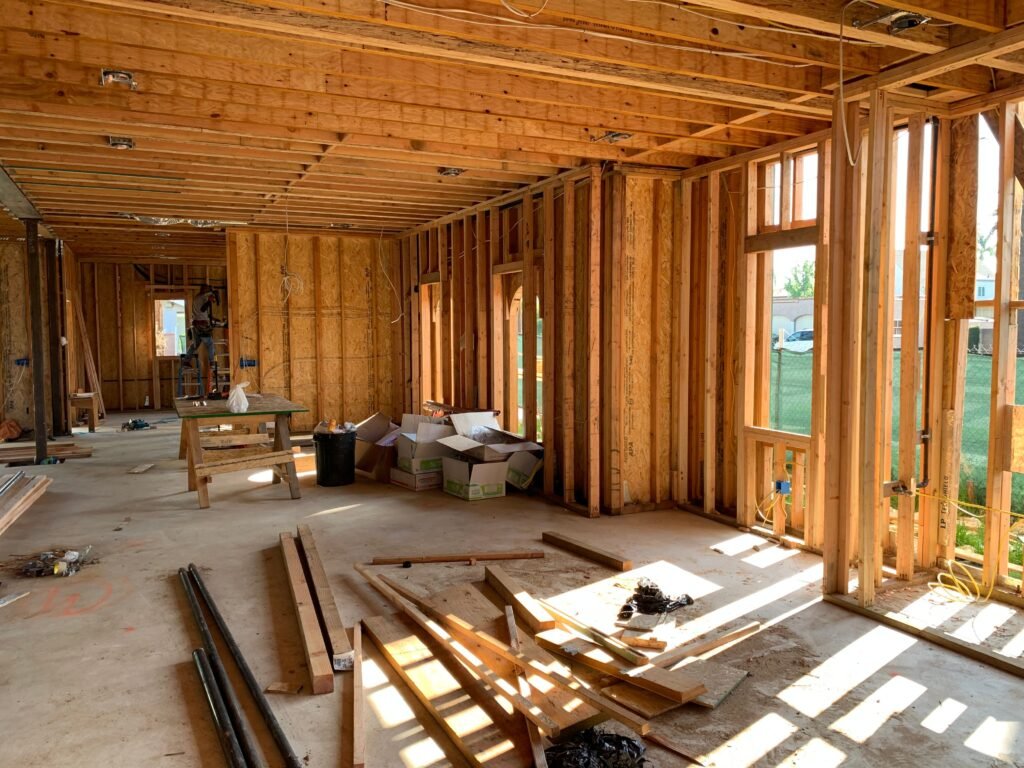
A pre-drywall walkthrough is a review of the remodel after framing and rough mechanical work have been substantially completed but before insulation or drywall conceals important components.
Depending on the project and construction sequence, there may be more than one walkthrough. Insulation may not yet be installed during the first review because framing, electrical, plumbing, gas, and mechanical systems may require separate rough inspections. A second review may occur after insulation and air sealing but before drywall.
The walkthrough may involve:
- The homeowner
- General contractor
- Project manager
- Architect or designer
- Structural engineer
- Electrician
- Plumber
- HVAC contractor
- Building inspector
- Energy professional
- Other relevant specialists
Not every person needs to attend at the same time. The contract, permit process, and project complexity should determine who reviews each stage.
Why Is the Pre-Drywall Stage So Important?
Walls and ceilings conceal many of the components that determine whether the finished space functions properly.
Before drywall, it is still possible to inspect or verify:
- Wall and ceiling framing
- Structural beams, headers and posts
- Plumbing supply and drain lines
- Electrical cables and boxes
- Lighting locations
- HVAC ducts and registers
- Exhaust ventilation
- Gas piping
- Fireblocking and draftstopping
- Insulation
- Air-sealing details
- Sound-control materials
- Waterproofing transitions
- Cabinet and railing supports
- Technology and low-voltage wiring
After drywall, many corrections become more disruptive and expensive. A careful review can identify obvious omissions, conflicts, damaged materials, or features placed differently from the approved plan.
Pre-Drywall Checklist at a Glance
| Area to review | What to verify | Why it matters |
|---|---|---|
| Approved plans | Room dimensions, openings and planned features | Confirms that construction follows the agreed design |
| Framing | Walls, headers, posts, blocking and damaged members | Structural work becomes difficult to view later |
| Plumbing | Pipe routes, fixture locations and test status | Helps catch leaks, conflicts and misplaced rough-ins |
| Electrical | Boxes, outlets, switches, lighting and dedicated circuits | Prevents inconvenient or missing electrical features |
| HVAC | Ducts, returns, registers and equipment clearances | Affects comfort, airflow, noise and maintenance |
| Ventilation | Bathroom, kitchen and dryer exhaust routes | Helps control moisture, odors and indoor pollutants |
| Insulation | Coverage, depth, gaps and compression | Affects comfort and energy performance |
| Air sealing | Penetrations, joints and exterior-wall gaps | Reduces uncontrolled air leakage |
| Blocking | Cabinets, grab bars, railings and wall-mounted items | Provides secure attachment behind the finished wall |
| Moisture control | Flashing, waterproofing and damp materials | Helps prevent concealed water damage |
| Inspections | Required rough approvals | Work may need to remain exposed until approved |
| Documentation | Photographs, videos and measurements | Creates a record of concealed systems |
This checklist is intended to help homeowners organize questions. It does not replace required inspections or professional evaluation.
Review the Approved Plans and Scope First
Bring the latest approved drawings, specifications, change orders, and relevant product information to the walkthrough.
Compare the exposed construction with:
- Room dimensions
- Wall locations
- Door and window openings
- Ceiling heights
- Beam and column locations
- Plumbing fixture positions
- Appliance locations
- Cabinet plans
- Lighting plans
- Electrical layouts
- HVAC registers
- Built-in storage
- Accessibility features
- Approved change orders
Make sure you are using the current set of documents. An outdated drawing may show walls, fixtures, or openings that were later revised.
If the installed work differs from the plan, ask why. The difference may reflect an approved field adjustment, an unexpected condition, or a mistake. Any change affecting cost, schedule, performance, or appearance should be documented.
Our guide explaining how to plan a home remodel discusses how drawings, product selections, permits, professional responsibilities, and written decisions fit into the broader project.
Confirm That Required Inspections Are Complete
Permitted work may need to remain exposed until the local building authority has inspected and approved it. Required inspections vary, but rough framing, plumbing, electrical, gas, mechanical, insulation, and fire-protection work may be reviewed at different stages.
The model International Residential Code states that rough plumbing, mechanical, gas, and electrical systems are inspected before they are covered or concealed. Your jurisdiction may use a different code edition or inspection sequence.
Ask the contractor:
- Which inspections are required?
- Which inspections have been requested?
- Which inspections have passed?
- Were any corrections required?
- Have those corrections been reinspected?
- Is written or electronic approval available?
- Can insulation or drywall legally proceed?
- Are any special inspections outstanding?
Do not rely only on a verbal statement that an inspection “went fine.” Keep available records such as inspection cards, online results, correction notices, and final approvals.
A building inspection is not the same as a complete quality inspection. The public inspector generally reviews applicable code requirements within a limited scope and time. The contractor and project professionals remain responsible for completing the contracted work correctly.
Check Wall Locations and Room Dimensions
Walk through every room and compare its size and shape with the plan.
Check:
- Wall positions
- Doorway widths
- Hallway widths
- Closet dimensions
- Alcove dimensions
- Ceiling changes
- Appliance openings
- Shower and bathtub spaces
- Cabinet runs
- Island clearances
- Furniture walls
- Walking paths
Framing can make a room feel different from a drawing. A doorway may be technically in the planned location but feel awkward when you stand in the room.
Use a tape measure where practical, but do not disturb the work. Confirm dimensions critical to ordered cabinets, appliances, shower doors, furniture, or built-in components.
Make sure doors have enough room to swing without striking cabinets, fixtures, walls, or other doors. Pocket doors require unobstructed wall cavities, so plumbing, electrical boxes, and other components should not interfere with the pocket.
Review Structural Framing
Structural work should be evaluated by the responsible professionals and building officials, but homeowners can look for visible conditions that deserve questions.
Review:
- Beams
- Headers
- Posts and columns
- Bearing walls
- Floor joists
- Ceiling joists
- Roof framing
- Stair openings
- Connections
- Structural hardware
- Engineered components
- Framing around large openings
- Repairs to existing framing
- New and existing foundation connections
Ask whether the installed framing matches the approved structural drawings. If substitutions or field modifications were made, request documentation showing who approved them.
Do not assume that a piece of framing is unnecessary because it interferes with the preferred layout. Never cut, drill, notch, relocate, or remove a structural component without appropriate evaluation.
If structural questions have developed during the project, our article about when a home remodel needs a structural engineer explains when specialized review may be appropriate.
Look for Improperly Cut or Drilled Framing
Plumbing, electrical, and mechanical lines often pass through studs, joists, and other framing. Codes and engineered-product instructions control where and how framing may be bored, notched, or cut.
Look for:
- Large holes through studs or joists
- Notches near the edges of framing
- Multiple holes placed close together
- Cut truss components
- Damaged engineered joists
- Pipes or ducts forced through undersized openings
- Splintered or cracked framing
- Missing protective plates
- Field changes that appear inconsistent with the plans
A visible hole does not automatically mean the framing is defective. Different components have different permitted limits. Ask the contractor or responsible design professional to explain questionable alterations.
Protective metal plates may be required where pipes or wiring pass close to the face of framing. These plates help reduce the risk of future screws or nails puncturing concealed utilities.
Verify Blocking and Backing
Blocking is additional framing installed inside walls to provide secure attachment for heavy or frequently used items.
It may be needed for:
- Kitchen cabinets
- Bathroom vanities
- Grab bars
- Handrails
- Stair railings
- Wall-mounted televisions
- Floating shelves
- Curtain rods
- Heavy mirrors
- Towel bars
- Shower doors
- Wall-mounted sinks
- Fold-down seats
- Exercise equipment
- Built-in furniture
- Closet systems
Locate these features on the plans and verify that support has been installed where needed. Record measurements from fixed reference points so the blocking can be found after drywall.
Blocking for future accessibility features can be inexpensive to add while the walls are open. It may be useful even when grab bars or other supports will not be installed immediately.
Inspect Plumbing Rough-Ins
A licensed or otherwise appropriately qualified plumber and the local inspector should evaluate technical compliance. Homeowners can still verify that fixture locations and planned features are correct.
Review the rough locations for:
- Sinks
- Toilets
- Bathtubs
- Showers
- Dishwashers
- Refrigerators
- Washing machines
- Utility sinks
- Hose connections
- Water heaters
- Floor drains
- Shutoff valves
- Cleanouts
Ask:
- Are fixture centers consistent with the plans?
- Will cabinets and fixtures fit around the pipes?
- Have supply lines been pressure-tested?
- Have drain and vent systems received required testing?
- Are shutoff valves accessible?
- Are cleanouts accessible?
- Are pipes protected from potential nails or screws?
- Are exterior-wall pipes appropriately protected for the climate?
- Are plumbing penetrations sealed where required?
- Are any pipes rubbing against framing?
- Were existing leaks or deteriorated pipes discovered?
Look for visible water, damp framing, staining, or loose connections. Any wet materials should be investigated and allowed to dry appropriately before the wall is closed.
Confirm Shower and Tub Details
Bathrooms combine plumbing, electrical work, ventilation, framing, and moisture control in a small area. Errors can become expensive after tile and fixtures are installed.
Before closing relevant walls, verify:
- Shower valve location and height
- Showerhead location
- Hand-shower connection
- Tub filler location
- Supply and drain alignment
- Shower niche framing
- Bench framing
- Grab-bar blocking
- Shower-door blocking
- Fixture clearances
- Exhaust-fan duct route
- Lighting positions
- Electrical requirements
- Access to serviceable components
Waterproofing may be installed at a later stage, depending on the system. When it is installed, confirm that it follows the selected product’s complete instructions. Do not mix components from unrelated systems unless the manufacturers and project professionals approve the assembly.
Drywall or backer-board installation should not proceed over active leaks, wet framing, or unresolved shower-layout problems.
Review Electrical Boxes, Outlets and Switches
Walk through the home as though it were finished. Imagine entering each room, turning on lights, charging devices, using appliances, cleaning, and arranging furniture.
Check the proposed locations of:
- General outlets
- Switches
- Dimmers
- Kitchen receptacles
- Bathroom receptacles
- Appliance connections
- Dedicated circuits
- Floor outlets
- Exterior outlets
- Garage outlets
- Television connections
- Internet and data wiring
- Security devices
- Smoke and carbon-monoxide alarms
- Doorbell wiring
- Thermostats
- Electric-vehicle equipment
- Future equipment connections
Consider whether switches will be hidden behind open doors or cabinets. Verify that countertop outlets will align with the cabinet and backsplash design.
Electrical boxes should be positioned for the intended finished wall thickness. Tile, paneling, stone, cabinets, and other finishes can change how far a box must project.
Technical requirements—including circuit capacity, grounding, protection, box fill, and wiring methods—should be evaluated by qualified professionals and inspectors.
Check the Lighting Layout
A ceiling full of exposed electrical boxes provides a valuable opportunity to understand where the finished fixtures will be located.
Confirm:
- Recessed-light positions
- Pendant locations
- Vanity lighting
- Under-cabinet wiring
- Closet lighting
- Stair lighting
- Exterior lighting
- Ceiling-fan support
- Decorative fixtures
- Task lighting
- Accent lighting
- Dimmer locations
- Multiway switching
Use the actual dimensions of islands, dining tables, vanities, cabinets, mirrors, beds, and furniture. A fixture centered in the room may not be centered over the feature it is intended to illuminate.
If a heavy light fixture or ceiling fan will be installed, verify that the correct support and electrical box are included.
Plan Low-Voltage Wiring and Technology
Low-voltage wiring is easier to install before insulation and drywall.
Possible systems include:
- Ethernet
- Television
- Speakers
- Security cameras
- Alarm sensors
- Smart-home controls
- Doorbells
- Intercoms
- Wi-Fi access points
- Motorized window coverings
- Landscape controls
- Future solar monitoring
- Electric-vehicle charger communication
Technology changes quickly, so avoid building the entire home around one device. Accessible conduit or pathways may offer more flexibility than permanently installed cables that are difficult to replace.
Plan an appropriate, ventilated location for routers, network switches, hubs, and other equipment. Do not seal serviceable electronic devices inside walls.
Inspect HVAC Ducts and Registers
HVAC systems affect comfort, noise, air quality, and energy use. Before drywall, verify that ducts and equipment have not been placed where they conflict with cabinets, lighting, plumbing, or structural components.
Review:
- Supply-register locations
- Return-air locations
- Duct routes
- Duct support
- Duct connections
- Equipment clearances
- Access panels
- Thermostat location
- Condensate drains
- Refrigerant lines
- Combustion-air provisions where applicable
- Fire and smoke dampers where required
Make sure finished furniture, curtains, cabinets, or doors will not block registers and returns.
Ask whether ducts have been protected from construction dust. Open ductwork can collect debris that may later be distributed through the home.
Verify Bathroom and Kitchen Exhaust Routes
Exhaust fans should move moisture, odors, and pollutants to an appropriate exterior termination—not into an attic, crawl space, wall cavity, garage, or other concealed area.
Check the routes for:
- Bathroom exhaust fans
- Kitchen range hoods
- Clothes dryers
- Other required exhaust equipment
Ask:
- Where does each duct terminate?
- Is the route as direct as reasonably possible?
- Is the duct size correct for the equipment?
- Are joints connected and sealed appropriately?
- Will the duct be insulated where needed?
- Is the exterior termination location appropriate?
- Does the route conflict with framing or other systems?
- Will the fan or appliance remain accessible for service?
Range hoods and dryers can have specific duct-material, length, clearance, and termination requirements. Follow the appliance instructions and applicable local rules.
Look for Conflicts Between Building Systems
Walls can become crowded when plumbing, electrical wiring, ducts, gas lines, insulation, blocking, and structural components compete for the same space.
Look for visible conflicts such as:
- A pipe occupying the planned cabinet recess
- A duct blocking a recessed light
- Wiring running through a pocket-door cavity
- Plumbing interfering with a wall niche
- A register beneath planned cabinetry
- Insufficient space around an electrical box
- A beam obstructing a duct route
- A vent passing through structural framing
- Equipment without maintenance access
These conflicts should be coordinated before drywall rather than left for a later trade to resolve by cutting or relocating completed work.
Check Fireblocking and Draftstopping
Fireblocking and draftstopping can restrict concealed air movement and slow the spread of fire and smoke through hidden cavities.
Relevant locations may include:
- Intersections between floors
- Concealed vertical and horizontal spaces
- Soffits
- Dropped ceilings
- Chases
- Stair areas
- Openings around pipes, ducts and cables
- Connections between walls and ceilings
- Furred walls
Requirements depend on the building and local code. Do not remove foam, sealants, blocking, or other materials simply because they appear untidy. Ask what purpose they serve.
Penetrations through required fire-resistance-rated assemblies may need approved firestopping systems rather than ordinary caulk or foam.
Review Insulation Before It Is Covered
Insulation performance depends on installation quality as well as the product’s stated R-value.
Inspect for:
- Missing sections
- Gaps
- Voids
- Compression
- Sagging
- Poor fit around wiring and pipes
- Incomplete coverage behind tubs or showers
- Uninsulated rim or band areas
- Misalignment with the air barrier
- Wind exposure near soffits
- Damp or damaged material
- Incorrect depth
- Blocked ventilation paths
Batt insulation should generally fit the cavity without large gaps or excessive compression. Blown and sprayed products should provide the specified coverage and depth.
The U.S. Department of Energy’s Building America guidance emphasizes that insulation and the air barrier should be aligned and continuous. Exact insulation and vapor-control requirements vary by climate and wall assembly.
Ask whether a required insulation inspection has passed before drywall installation begins.
Examine Air-Sealing Details
Insulation does not necessarily stop uncontrolled air movement. Gaps around penetrations, framing transitions, windows, doors, and utility chases can allow conditioned air to escape and outdoor air to enter.
Potential air-leakage locations include:
- Bottom and top plates
- Rim joists
- Window and door openings
- Plumbing penetrations
- Electrical penetrations
- Duct chases
- Exhaust-fan housings
- Recessed lights
- Dropped ceilings
- Fireplace surrounds
- Attic access points
- Wall-to-ceiling transitions
- Connections between additions and the existing home
Air-sealing products must be appropriate for the location, gap size, temperature, fire requirements, and surrounding materials.
The Department of Energy explains that air sealing can improve comfort and durability while reducing uncontrolled air leakage. Some air-sealing details are easiest to complete while framing remains accessible.
Consider Sound Control
If sound insulation or acoustic separation is part of the project, verify it before walls and ceilings are closed.
Review areas around:
- Bedrooms
- Bathrooms
- Laundry rooms
- Home offices
- Media rooms
- Mechanical rooms
- Plumbing stacks
- Shared walls
- Floors between living spaces
- Attached garages
Sound-control measures may include insulation, resilient channels, isolation clips, additional wallboard layers, sealants, solid-core doors, pipe wrapping, or other assemblies.
The components must be installed as a system. Small gaps, incorrectly attached channels, back-to-back electrical boxes, and unsealed penetrations can reduce performance.
Our home office design ideas include additional considerations for privacy, background noise, lighting, and everyday workspace function.
Inspect Windows and Exterior Doors From Inside
With the surrounding framing exposed, review the installation of new or modified windows and doors.
Look for:
- Correct opening dimensions
- Level and plumb installation
- Appropriate shimming
- Visible water intrusion
- Damaged frames
- Missing insulation around openings
- Incomplete air sealing
- Flashing questions
- Improper fasteners
- Operation problems
- Gaps that may affect trim
- Threshold support
Exterior flashing may not be fully visible from inside. Ask how each opening was integrated with the exterior water-management system and request photographs if those details have already been concealed.
Confirm Cabinet and Appliance Requirements
Cabinets and appliances depend on accurate rough dimensions and utility locations.
Before drywall, compare the approved cabinet plan with:
- Wall lengths
- Ceiling heights
- Window positions
- Door casing
- Plumbing centers
- Gas connections
- Electrical outlets
- Appliance circuits
- Range-hood ducting
- Refrigerator water lines
- Dishwasher connections
- Microwave ventilation
- Island utilities
- Cabinet blocking
- Finished floor height
Do not assume utilities can easily be moved after cabinets arrive. A small rough-in error can prevent an appliance from fitting or place pipes inside a drawer.
Check Future Accessibility Features
Even if the current remodel is not an accessibility project, open walls provide an opportunity to prepare for future needs.
Potential additions include:
- Grab-bar blocking
- Handrail support
- Reinforcement for fold-down shower seating
- Wider door framing where feasible
- Support for wall-mounted fixtures
- Electrical service for future lifts
- Accessible switch and outlet locations
- Curbless-shower preparation
- Lever-handle compatibility
- Improved lighting
Photograph and measure all concealed reinforcement. Our guide to aging-in-place remodeling ideas explains how bathrooms, entrances, stairs, kitchens, lighting, and circulation can be planned for changing household needs.
Make Sure Materials Are Dry
Drywall should not conceal wet framing, damp insulation, active leaks, or unresolved moisture damage.
Look and ask about:
- Roof or window leaks
- Plumbing leaks
- Wet lumber
- Damp insulation
- Water staining
- Musty odors
- Condensation
- Foundation moisture
- Recent rain exposure
- Indoor humidity during construction
A moisture meter may be appropriate when materials have been exposed to water. The acceptable moisture level depends on the material, climate, finish, and professional judgment.
The source of moisture should be corrected before walls are closed. Simply allowing the visible surface to dry may not address water trapped inside an assembly.
Photograph Everything Before Drywall
Create a complete visual record after rough work is finished and before it is concealed.
Photograph every wall and ceiling from several angles. Include:
- Plumbing lines
- Electrical cables
- Junction boxes
- Ducts
- Gas lines
- Blocking
- Structural framing
- Beams and posts
- Fireblocking
- Shutoff valves
- Cleanouts
- Low-voltage wiring
- Insulation
- Waterproofing
- Window and door details
- Wall cavities containing utilities
For greater usefulness:
- Photograph the entire wall before taking close-ups
- Include a tape measure in important images
- Measure from corners, floors, ceilings, windows or doors
- Label images by room and wall
- Photograph both sides of shared walls
- Record video while slowly walking through each room
- Save original high-resolution files
- Back up the files in more than one location
A close-up of a pipe without surrounding reference points may be difficult to interpret later.
These records can help when installing shelves, locating utilities, investigating a leak, planning another remodel, or explaining completed work to a future owner. Our guide to remodeling documents you should keep provides a broader list of plans, permits, warranties, approvals, receipts, and other records worth retaining.
Ask for Corrections in Writing
If you identify a possible problem, document it and ask the appropriate project professional to respond.
A written item should include:
- Room and exact location
- Photograph
- Description of the concern
- Relevant plan or specification
- Person responsible for reviewing it
- Agreed correction
- Effect on price or schedule
- Date the correction was completed
- Reinspection status where applicable
Avoid directing individual trades without coordinating through the contractor or project manager. Uncoordinated instructions can create conflicting work and disputes about responsibility.
Do not authorize drywall over an unresolved item merely because the schedule is tight. Agree on how the concern will be evaluated and documented.
Do Not Treat the Walkthrough as a Technical Inspection
Homeowners can verify layout, planned features, documentation, and visible workmanship concerns, but they are generally not qualified to approve structural, electrical, plumbing, gas, mechanical, waterproofing, or fire-protection work.
A pre-drywall walkthrough does not replace:
- Government inspections
- Architect observations
- Structural-engineer inspections
- Trade testing
- Energy inspections
- Manufacturer-required inspections
- Independent professional evaluations
- Contractor quality control
If the project is complex or the homeowner has significant concerns, an independent professional inspection may be considered before concealment. Confirm the inspector’s qualifications and define the scope in advance.
Common Mistakes to Catch Before Drywall
Problems worth identifying before walls close may include:
- Missing outlets or switches
- Lighting centered incorrectly
- Plumbing rough-ins misaligned with cabinets
- Missing cabinet or grab-bar blocking
- Ducts interfering with lights
- An exhaust duct ending in a concealed space
- Wiring inside a pocket-door cavity
- Missing insulation
- Compressed or poorly fitted insulation
- Unsealed penetrations
- Wet framing
- Missing protective plates
- Damaged joists or studs
- Unapproved structural changes
- Inaccessible valves or cleanouts
- Missing low-voltage wiring
- Incorrect appliance connections
- Incomplete fireblocking
- Failed or outstanding inspections
- Work that does not match approved change orders
Not every visible irregularity is a defect. Use the walkthrough to ask specific questions and obtain informed answers.
Frequently Asked Questions
When should a pre-drywall walkthrough happen?
It should occur after the relevant framing and rough systems have been installed but before they are concealed. Because inspections and insulation may occur at different stages, more than one review may be useful.
Can drywall be installed before rough inspections?
Work subject to inspection generally must remain exposed until the required approval is received. Exact requirements and procedures vary by jurisdiction.
Should homeowners attend the pre-drywall walkthrough?
Attending can help homeowners verify layouts, locations, planned features, and documentation. Technical approval should remain with qualified professionals and building officials.
What should you photograph before drywall?
Photograph framing, wiring, plumbing, ducts, gas lines, blocking, structural components, low-voltage wiring, waterproofing, insulation, valves, cleanouts, and every wall or ceiling containing concealed systems.
Should insulation be installed before the walkthrough?
There may be one walkthrough before insulation and another after insulation and air sealing. The construction and inspection sequence varies by project and location.
Can you request additional outlets before drywall?
Possibly. The electrician, contractor, and designer should determine whether the requested location is permitted and whether the existing circuit and plans can accommodate it. The change should be priced and documented before work proceeds.
What happens if a problem is found?
Document the concern, identify who is responsible for evaluating it, agree on the correction, and confirm whether reinspection is required. Keep written and photographic records.
Should you hire an independent pre-drywall inspector?
An independent inspection may be useful for a complex project or when the homeowner wants additional review. It does not replace government inspections, contractor responsibilities, or specialized engineering and trade evaluations.
What if the contractor wants to install drywall before concerns are resolved?
Ask that the specific areas remain open until the concern has been reviewed and the agreed correction documented. Refer to the contract, plans, permit requirements, and responsible project professionals.
How long should you keep pre-drywall photographs?
Keep them for as long as you own the home, along with plans, permits, inspection approvals, product information, warranties, and remodeling records.
Use the Last Clear View of Your Walls Wisely
The pre-drywall stage is the final opportunity to see many of the systems that will support the finished rooms. Use it to compare construction with the approved plans, verify fixture and outlet locations, review blocking, document concealed utilities, and confirm that required inspections are complete.
Pay particular attention to features that affect everyday use: switches, lighting, cabinet supports, appliance connections, plumbing locations, ventilation, technology wiring, and future accessibility.
Most importantly, photograph and measure the exposed work before it disappears. A well-organized record can remain valuable long after the remodeling project is finished.
Remodeling Note: This article provides general educational information and is not a substitute for building inspections, engineering, architectural services, trade expertise, or code review. Inspection requirements, construction methods, building codes, permits, professional responsibilities, and appropriate pre-drywall checks vary by project and location. Consult qualified local professionals and the appropriate building department before concealing structural, electrical, plumbing, gas, mechanical, insulation, waterproofing, or fire-protection work.